CashQuotes Win 8.1 App. Initial Setup of the Universal App Project (part 1)
Today I’m going to start a series of posts about how to create a Universal App for Windows. I’m planning to blog about it once per week and document everything that I find interesting on my way.
I hope that by the time I finish this series I’ll have a fully working application which can work on Windows and Windows Phone. Also, I’m going to open-source it on GitHub.
Here is a rough plan:
-
Part 1. Initial Setup of the project in Visual Studio - this is the current post. I’ll explain what I’m going to build and create a skeleton solution in Visual Studio to show how I prefer to organize code.
-
Part 3. Data Binding and Data Contexts.
-
App settings: customizing app behavior for a user.
-
Testing: how to test services and the UI.
Let’s start!
What to build?
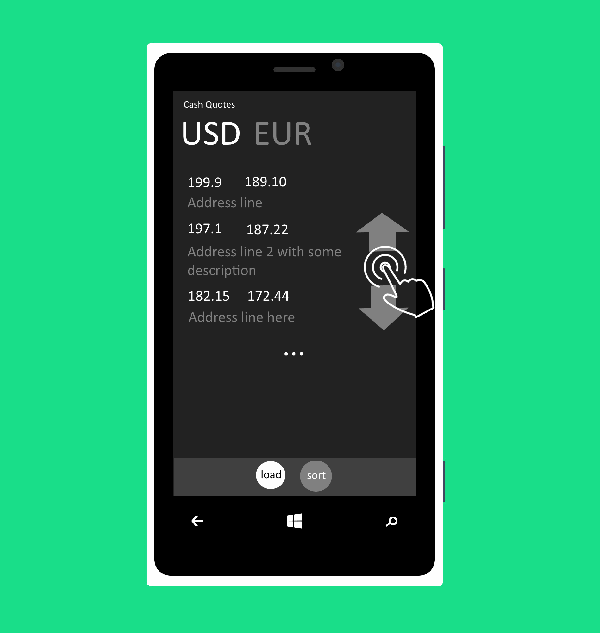
I’m going to build the application that will show real currency exchange rates in Russian banks. (You might be wondering why I chose this subject, but let’s skip on this for now :)
In other words, the application will fetch some numeric data and show it in a grid. Each item will have two numeric properties and an address. There will be also a detailed view for items in a grid and probably a page with app settings. That’s basically it. I know it’s not very impressive. Still I’m sure there will be many little things to discover!
Here is the mock of the UI:
Create a solution
One thing that I’d like to note: this is not going to be a step-by-step tutorial. I’ll concentrate on the most important steps skipping all the low-level plumbing like “go there, click that :)”.
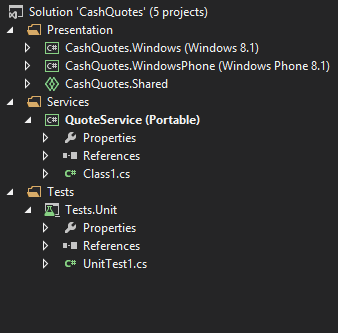
Now, let go ahead and create a new Blank Universal App in Visual Studio. I like putting all projects into different folders organizing stuff by its “category”. The three projects created by VS are all about “presentation”. I’m definitely going to need a project to hold all my tests. Also, I usually have a class library project to hold all logic. Although the Universal project template assumes that you will put your sharable logic into Shared project, I discovered that it’s much easier to test your code if it’s in a Portable library project.
So at this moment my setup looks like this:
Phone app basics
I won’t touch the Windows project for now and will concentrate on the phone version of the application. Per project template, most of the presentation code should go into Shared project whereas Phone and Windows projects should contain only platform-specific code. This is fine, let’s just do that.
I created a new page called QuoteListPage.xaml:
<Page
    x:Class="CashQuotes.QuoteListPage"
    ...
    Background="{ThemeResource ApplicationPageBackgroundThemeBrush}">

    <Grid>
        <Pivot Title="Cash Quote">
            <PivotItem Header="USD">
                <GridView x:Name="ItemGridView"
                        Background="{StaticResource ApplicationPageBackgroundThemeBrush}"
                        ShowsScrollingPlaceholders="False"
                        VerticalAlignment="Top"
                        ScrollViewer.VerticalScrollBarVisibility="Auto"
                        ScrollViewer.HorizontalScrollBarVisibility="Auto"
                        SelectionMode="None" />
            </PivotItem>
            <PivotItem Header="EUR">
                <Grid/>
            </PivotItem>
        </Pivot>
    </Grid>

    <Page.BottomAppBar>
        <CommandBar>
            <CommandBar.PrimaryCommands>
                <AppBarButton x:Name="RefreshAppBarButton" Label="Refresh" Icon="Refresh" Click="RefreshAppBarButton_Click" />
                <AppBarButton x:Name="SortAppBarButton" Label="Sort" Icon="Sort" Click="SortAppBarButton_OnClick"/>
            </CommandBar.PrimaryCommands>
            <CommandBar.SecondaryCommands>
                <AppBarButton x:Name="AboutAppBarButton" Label="about"  />
            </CommandBar.SecondaryCommands>
        </CommandBar>
    </Page.BottomAppBar>
</Page>
…and a fairly empty code-behind file:
/// <summary>
/// Page that lists exchange rates (quotes) in a gridview
/// </summary>
public sealed partial class QuoteListPage : Page
{
  public QuoteListPage()
  {
    this.InitializeComponent();
  }

  protected override void OnNavigatedTo(NavigationEventArgs e)
  {
    // TODO: ItemGridView.ItemsSource = data from service
  }

  private void RefreshAppBarButton_Click(object sender, RoutedEventArgs e)
  {
    // TODO: ItemGridView.ItemsSource = data from service
  }

  private void SortAppBarButton_OnClick(object sender, RoutedEventArgs e)
  {
    // TODO: show a menu to choose how to sort the grid data
  }
}
My phone app will use Frame control for navigation. So let’s make sure that the MainPage.xaml file has it:
<Page
    x:Class="CashQuotes.MainPage"
    ...
    Background="{ThemeResource ApplicationPageBackgroundThemeBrush}">

    <Frame x:Name="MainFrame" />

</Page>
The Frame control will then be used in the code-behind MainPage.xaml.cs to load pages as user navigates through the app:
/// <summary>
/// Invoked when this page is about to be displayed in a Frame.
/// </summary>
/// <param name="e">Event data that describes how this page was reached.
/// This parameter is typically used to configure the page.</param>
protected override void OnNavigatedTo(NavigationEventArgs e)
{
  if (MainFrame.Content == null)
    if (!MainFrame.Navigate(typeof(QuoteListPage)))
      throw new Exception("Failed to navigate to a page with a list of Quotes");
}
Good. Now the application shows a basic UI and you’re actually able to click and pivot and see all those nice animations and transformations.
So this is where I’ll stop today. It has been quite simple so far, but next week it’ll be more interesting and feature-intensive. I’ll write about how to display actual data in the GridView.
In the meantime feel free to check out the full code on GitHub, there is a tag week1 that marks today’s changes.
If you have questions or comments, or would like to share your thoughts, leave a comment!